

Vandaag een paar oorbellen met wat meer werk aan. Ze vragen ook wat meer behendigheid. Wellicht is dit ontwerp als absolute beginner eerder een uitdaging. Maar een uitdaging kan ook tof zijn natuurlijk. En geef toe: het resultaat is mooi! Ik gebruikte voor deze bellen de techniek van het 'wirewrappen'.
Today a pair of earrings that take more time and work to make. It also require a bit of skills, this design is not easy to make for an absolute beginner. For a beginner it might be a challenge, but challenges can be fun ;) . And the result is gorgeous, no? For this pair of earrings I used the technique 'wirewrapping'.

BENODIGDHEDEN/SUPPLIES
materiaal/material
- een portie kleine groene rocailles/ some small green seed beads
- een portie kleine lichtroze rocailles/some small soft pink seed beads
- een portie kleine paarsige rocailles/some small purple seed beads
- 2 x 1 groene gefaceteerde glazen druppelkraal/green faceted glass drop bead
- een grote gesloten ring/big closed ring
- 2 x 1 klein goudkeurig buttonkraaltje/small gold coloured button bead
- 2 x 1 kettelstift/eye pin
- een flink eind soepele metaaldraad/a piece of easy to bend metal wire
- oorhaakjes/ear wire

gereedschap/tools

ZO MAAK JE HET/DIY
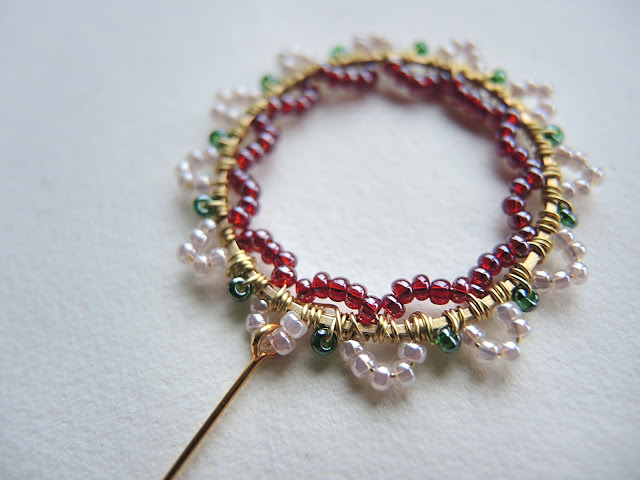
Neem een stuk metaaldraad en draai dat een aantal keren losjes om de ring. Dat is mijn manier om de draad vast te zetten terwijl je de bellen maakt. Eens je ontwerp goed vertrokken is, mag je het losse eind terug loswikkelen en afknippen.
Take a piece of metal wire an wrap it loosely around the ring. I fix the wire this way to be able to create the design. Once the design is growing, you can unwrap the loose wraps and cut the end.

Draai de draad 2 keer rond de ring, rijg een groen kraaltje aan en duw het tot tegen de ring en draai de draad opnieuw 2 keer rond de ring. Zo heb je het groen kraaltje vastgezet tegen de ring.
Wrap the wire twice around the ring, add a green rocaille and pull it close to the ring, again wrap the metal wire twice around the ring. This way you fixed the green bead close to the ring.

Rijg 5 zachtroze kraaltjes aan, plooi de draad tot in een boogje en wikkel de draad opnieuw 2 keer rond de ring.
String 5 soft pink beads and bend into a bow. Wrap the metal wire twice around the ring.

Blijf dit patroon herhalen tot je rond bent. KNIP DE DRAAD NIET AF!
Repeat this pattern until you reach the beginning. DON'T CUT THE WIRE!

Draai de draad 2 keer rond de ring in het boogje van de 5 roze kraaltjes.
Wrap the wire around the ring twice, in the hole of the bow of soft pink beads.

Rijg 5 paarse rocailles aan en draai de draad weer 2 keer rond de ring in de holte van het volgende roze boogje.
String 5 purple seed beads and again wrap the wire twice around the ring, into the hole of the pink beaded bow.

Herhaal dit weer tot je helemaal rond bent. Knip de draad af en werk de losse eindjes weg.
Repeat until you reach the beginning. Cut loose end.

Bevestig de kettelstift aan 1 van de roze boogjes.
Attach eye pin onto one of the pink bows.
Rijg aan: 1 druppelkraal + 1 buttonkraal + 1 rocaille en maak een oogje. Bevestig een oorhaakje aan het oogje en oorbel 1 is klaar.
String: 1 drop bead + 1 button bead + 1 seed bead and make a loop. Attach ear wire. Earring one is done.

Maak er nog eentje en straal!
Make another one and shine!

Meer juwelentutorials hier ...
More jewelry tutorials here ...
Ik heb een reclame- en sponsorvrije blog en kreeg niks in ruil voor de aankoop van deze kralen. Ik kocht ze op eigen initiatief en betaalde de volle pot. / I have an add- and sponsor free blog and I bought these beads at full price at my own initiative and without any form of compensation for writing this blog post.
Lees dit voor mijn regels rond gebruik en copyright voor mijn ontwerpen/ More info about my rules for copyright on my designs.
It looks so pretty with the scallops. Thanks for sharing
BeantwoordenVerwijderenMooi gemaakt!
BeantwoordenVerwijderenAbsolutely lovely!
BeantwoordenVerwijderenMichelle
https://mybijoulifeonline.com
This is very pretty! Your tutorial was easy to follow, too. I appreciate it! Thanks for sharing with us at Creatively Crafty #ccbg :)
BeantwoordenVerwijderen