

Vele jaren geleden - zeker minstens 10 ! - stond ik te graaien tussen wat spullen op een wat verlaten stoffige rommelmarkt in de felle zon op een parkeerplaats in het zuiden van Frankrijk.
Ik kocht er dit strooiblik.
Het staat nog altijd in mijn kast, ik vind het nog altijd erg mooi en heb het nog altijd niet gebruikt ... .
Maar laat dat maar staan, het staat er goed... .
En wie weet : ooit ga ik dat echt dringend nodig hebben ... .
Ik kocht er dit strooiblik.
Het staat nog altijd in mijn kast, ik vind het nog altijd erg mooi en heb het nog altijd niet gebruikt ... .
Maar laat dat maar staan, het staat er goed... .
En wie weet : ooit ga ik dat echt dringend nodig hebben ... .
Many years ago—at least ten, for sure!—I was rummaging through some stuff at a rather deserted, dusty flea market in the blazing sun on a parking lot in the south of France. That's where I bought this vintage sifter tin. It's still sitting in my cupboard, I still think it's beautiful, and I still haven't used it... But hey, let it be, it looks good right where it is. And who knows: maybe one day I'm going to desperately need it..

De boog wordt gehaakt over de breedte van 6 onderliggende steken.
Start met een vaste.
Each arch is crocheted across the width of 6 stitches from the row below. Start with a single crochet.

Dan een losse.
 Haak een

Je hebt dan een nopje dat bestaat uit 2 lagen stokjes.
You will then have a bobble that consists of two layers of double crochets.
 Haak 4 lossen.

En eindig met een vaste in het middelste stokje van het onderliggend boogje.
Herhaal nu dit patroon tot je helemaal rond bent en je randje is af !


Ik kocht er ook een doek met franje waarvan het folkloristisch dessin en kleuren me erg bekoorden.
De franjes waren echter niet meer in goede conditie dus bleef ook deze doek in de lade van mijn kleerkast wegkwijnen .
Tot ik deze zomer besloot daar wat aan te doen... .
De franjes waren echter niet meer in goede conditie dus bleef ook deze doek in de lade van mijn kleerkast wegkwijnen .
Tot ik deze zomer besloot daar wat aan te doen... .
I also bought a fringed cloth there, as I was completely charmed by its folkloric pattern and colours. However, the fringes were no longer in good condition, so this cloth ended up languishing in my wardrobe drawer as well. Until this summer, when I decided to finally do something about it...

Ik verwijderde de franjes en haakte een nieuw randje.

Ik verwijderde de franjes en haakte een nieuw randje.
I removed the fringes and crocheted a new edge.


Mijn voorraad haakboeken werd bovengehaald en ik toog op zoek naar het geschikte randje : het moest wat bengelen vond ik .
Ik vond een uitermate mooi randje met bengelende kersen, maar het ontcijferen van het patroon bleek me écht niet te lukken en toen besloot ik er maar eentje bijeen te improviseren.
I dug out my stash of crochet books and set off in search of the right edge, deciding it needed to have a bit of a dangle to it. I found an exceptionally pretty border featuring dangling cherries, but deciphering the pattern turned out to be completely beyond me, so I decided to just improvise one instead.

BENODIGDHEDEN/SUPPLIES
- Voor mijn doek had ik iets meer dan 2 bolletjes zwarte Catania nodig./ I needed a bit more than 2 skeins of black Catania.
- En ik gebruikte haaknaald 2 en 3/ And I used a hook 2 and 3: - Haaknaald 2 voor rij 1/hook 2 for row 1.
- De rest deed ik met haaknaald 3/The rest of the pattern with hook 3.

 Toen ik de oude franjes verwijderd had, bleken er kleine gaatjes in de rand van het doek te zitten. Dat had als gevolg dat ik onmiddellijk kon beginnen met haken, want mijn haaknaald kon door de gaatjes. Als dat bij jou niet het geval is, begin je met een rij genaaide festonsteek. Je kan dan mijn eerste rij gewoon overslagen...Once I had removed the old fringes, I noticed there were tiny holes along the edge of the fabric. This meant I could start crocheting right away, as my crochet hook fit right through them. If that’s not the case for you, you'll need to start with a row of blanket stitches. You can then simply skip my first row...

Maar ik had dus die gaatjes en haakte daarom telkens een vaste in het gaatje en daartussen 4 lossen met haaknaald nummer 2.
But since I had those holes, I just crocheted a single crochet into each hole, with 4 chain stitches in between, using a size 2 crochet hook.
 Dan had ik dit.
- De rest deed ik met haaknaald 3/The rest of the pattern with hook 3.

EXTRA INFORMATIE/INFORMATION
Ik gebruikte de Amerikaanse termen (omdat ik dit vertaalde met ChatGPT en dat er uit kwam). Maar voor de Britse lezers heb ik hier een tabelletje met de vertalingen van de steken:
I used US terms (since I translated this using ChatGPT and that’s what came out). However, for my British readers, here is an overview with the stitch translations:
NEDERLANDS US UK
Losse Chain stitch Chain stitch
Vaste Single crochet Double crochet
Stokje Double crochet Treble crochet
Halve vaste Slip stitch Slip stitch
ZO MAAK JE HET/DIY
rij/row 1
 Toen ik de oude franjes verwijderd had, bleken er kleine gaatjes in de rand van het doek te zitten. Dat had als gevolg dat ik onmiddellijk kon beginnen met haken, want mijn haaknaald kon door de gaatjes. Als dat bij jou niet het geval is, begin je met een rij genaaide festonsteek. Je kan dan mijn eerste rij gewoon overslagen...

Maar ik had dus die gaatjes en haakte daarom telkens een vaste in het gaatje en daartussen 4 lossen met haaknaald nummer 2.
But since I had those holes, I just crocheted a single crochet into each hole, with 4 chain stitches in between, using a size 2 crochet hook.
 Dan had ik dit.
This is the result...
Je moet je aantal lossen aanpassen aan de ruimte tussen de vasten, de lossen moeten min of meer evenwijdig liggen met de stof, het is niet de bedoeling dat er een boogje ontstaat.
You need to adjust your number of chain stitches to the space between the single crochets; the chains should run more or less parallel to the fabric, as they aren't meant to form an arch
rij/row 2
 Voor de 2de rij haakte ik vasten rond de eerste rij lossen : 4 per lus...
For the second row, I crocheted single crochets around the first row of chains: 4 per loop...
rij/row 3
In de derde rij haakte ik boogjes en dat deed ik zo :
For the third row, I crocheted arches, and this is how I did it:

De boog wordt gehaakt over de breedte van 6 onderliggende steken.
Start met een vaste.
Each arch is crocheted across the width of 6 stitches from the row below. Start with a single crochet.

Dan een losse.


Then one chain stitch.
 Haak terug een stokje in dezelfde onderliggende steek als het vorige stokje.

Crochet another double crochet into the same stitch as the previous double crochet.
Haak weer een losse.
Haak weer een losse.
Then one chain stitch.
 En herhaal : haak een stokje in dezelfde steek als de vorige 2 stokjes .
Je hebt nu 1 stokje + 1 losse + 1 stokje + 1 losse + 1 stokje in dezelfde onderliggende steek.

Je hebt nu 1 stokje + 1 losse + 1 stokje + 1 losse + 1 stokje in dezelfde onderliggende steek.
And repeat: crochet a double crochet into the same stitch as the previous two double crochets. You now have 1 double crochet + 1 chain stitch + 1 double crochet + 1 chain stitch + 1 double crochet all in the same stitch.
 Haak opnieuw een losse.
Then one chain stitch.

En eindig met een vaste 2 onderliggende steken verder. Het eerste boogje is klaar.
Dit patroon herhaal je tot je rond bent.
And finish with a single crochet 2 stitches further along. The first arch is now finished. Repeat this pattern all the way around.
Eigenlijk heb je zo al een mooi randje op zich, maar ik wilde toch ook iets dat wat zou bengelen...
Honestly, this makes for a lovely border all on its own, but I still wanted something with a bit of a dangle to it...

rij/row 4
Voor rij 4 besloot ik terug te grijpen naar een mij vertrouwd randje: het bolletjesrandje dat ik hier ook al eens stap voor stap liet zien.

Voor rij 4 besloot ik terug te grijpen naar een mij vertrouwd randje: het bolletjesrandje dat ik hier ook al eens stap voor stap liet zien.
For row 4, I decided to go back to a border I know well: the pom-pom edge, which I’ve already shown you here step by step.
 Haak 5 lossen, vertrekkende van het middelste stokje van het boogje in de rij eronder.
Chain 5, starting from the middle double crochet of the arch in the row below.

En begin met een stokje te haken in de 4de losse vanaf de haakpen. Maar je maakt de steek niet af, je laat hem halverwege op de haaknaald zitten .
And start by working a double crochet into the 4th chain from the hook, but do not complete the stitch; leave it halfway on your hook.
 Dat herhaal je nog eens in dezelfde losse, nu heb je 3 lussen op de haaknaald.

Repeat this once more into the same chain stitch; you now have 3 loops on your hook.
 En nog een keertje : 4 lussen nu.

And one more time: 4 loops around your hook now.
 Pas dan haal je de draad door alle lussen en dan heb je dit.

Only then do you pull the yarn through all the loops, and you'll have this.
 Draai om en haak 3 lossen.

Turn around and chain 3

stokje in de steek van de vorige rij maar maak het weer niet helemaal af.
Crochet a double crochet into the stitch from the previous row, but again, do not complete it fully.
 Nog een stokje dat je halverwege stopt in dezelfde onderliggende steek en je hebt 3 lussen op de haaknaald.

Another double crochet that you stop halfway into the same stitch, and you'll have 3 loops on your hook.
 En nog een laatste keer.

And repeat a last time ...
 Waarna je de steken helemaal haakt door de draad door de 4 lussen te halen.

After which you finish the stitches completely by pulling the yarn through all 4 loops.
 Plooi het stukje dat je net hebt gehaakt naar beneden en haak ze aan mekaar door de draad onder de rij lossen door te halen en vast te haken.

Fold down the piece you just crocheted and attach the halves together by pulling the yarn underneath the row of chains and securing it

Je hebt dan een nopje dat bestaat uit 2 lagen stokjes.
You will then have a bobble that consists of two layers of double crochets.

4 chain.

En eindig met een vaste in het middelste stokje van het onderliggend boogje.
Herhaal nu dit patroon tot je helemaal rond bent en je randje is af !
And finish with a single crochet into the middle double crochet of the arch below. Now repeat this pattern all the way around, and your border is finished!
Is de laatste rij niet helemaal duidelijk, kijk dan ook eens op de vorige tut die ik er over schreef... Omdat ik toen roos garen gebruikte, is dat misschien duidelijker zichtbaar dan zwart...
Is de laatste rij niet helemaal duidelijk, kijk dan ook eens op de vorige tut die ik er over schreef... Omdat ik toen roos garen gebruikte, is dat misschien duidelijker zichtbaar dan zwart...
If the last row isn’t completely clear, be sure to check out the previous tutorial I wrote about it... Because I used pink yarn back then, it might be easier to see than the black...

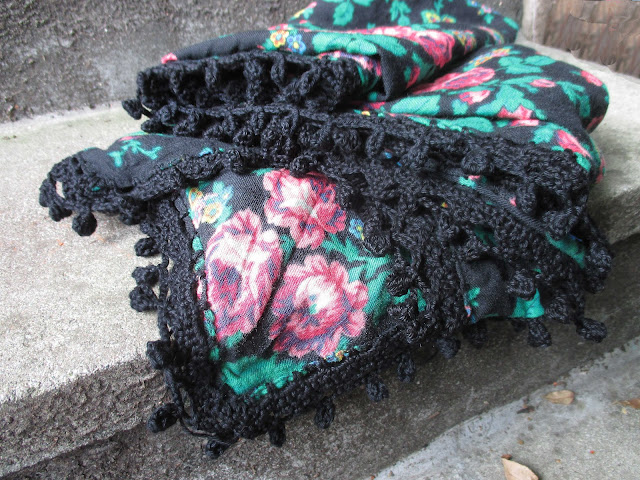
Ik weet eigenlijk niet precies waar deze doek oorspronkelijk moest voor dienen. Het is een vierkante doek en ik zag er altijd een omslagdoek in die je in een driehoek gevouwen over de schouders kan dragen.
Maar misschien was het wel een tafelkleed ?
Of een dekentje ?
Wat het ook moet zijn, ik vind het mooi en ik ben content dat ik dit stukje oud textiel eindelijk terug in bruikbare staat bracht.
Het materiaal bevat minstens een beetje wol want de stof kriebelt een klein beetje. Maar gelukkig juist niet hard genoeg om irritant te zijn.
To be honest, I don't really know what this cloth was originally intended for. It’s a square piece, and I always envisioned it as a shawl that you could fold into a triangle and wear draped over your shoulders. But who knows, maybe it was meant to be a tablecloth? Or a small blanket? Whatever it was supposed to be, I think it’s beautiful, and I’m just so happy that I finally brought this piece of vintage textile back to life. The fabric contains at least a little bit of wool, because it is slightly itchy—but luckily, just not enough to be annoying.

Ik heb een reclame- en sponsorvrije blog en kreeg niks in ruil voor de aankoop van dit materiaal. Ik kocht het op eigen initiatief en betaalde de volle pot. / I have an add- and sponsor free blog and I bought this material at full price at my own initiative and without any form of compensation for writing this blog post.
I think I remember you sharing this pretty fringe scarf. It is quite beautiful!
BeantwoordenVerwijderenwww.chezmireillefashiontravelmom.com
It's lovely how you have given new purpose to this pretty cloth, every clever. Thanks for linking!
BeantwoordenVerwijderen